It feels good to be back in the studio and getting things done.
On the weekend, I created my starter block for the VMQG Round Robin project. Last year, we had 8 participants, and had some fabulous quilts at the end of the project – you can see 5 of them here. And below you can see my starting block, and the finished quilt.
This year, I’m going for a wonky look, so I made my starting block non-square. I hope the other participants will add some wonky borders. I won’t see my block or the progress on my quilt top for the next 12 months, until we have the big reveal.
The block lotto this month is a cute little block called Raspberry Kiss. Finishing at only 4 1/4 inches, the blocks are a little smaller than I prefer, but they go together quickly and they’re cute, so I made 4 of them. If I win the lotto, I would make some larger versions of the block.
I have lots more projects on the go, and if you come back on Friday you’ll see what I’ve accomplished this week.
Today, I’m linking up with these blogs – click on the links below, where you’ll find many other creative projects to inspire you.
I really hadn’t intended to go almost 3 weeks without posting. I was immersed in a couple of projects, but now I can come up for air and share what I’ve been doing.
I mentioned in early January that I would be visiting my fiber artist sister Anne to spend a few days in her studio to start working together on a collaborative fiber art project. At the end of January, I spent 4 fun-filled days with Anne, experimenting with a variety of surface design techniques and planning our collaborative project(s).
A cheerful mixed media sign welcomes you to Anne’s studio, which is well-stocked with many surface design supplies and tools.
We had decided to focus on a limited color palette – various shades of red with accents of chartreuse (we both love that color!) We each brought a supply of fabrics to share. The first day, we made a plan of the techniques we would experiment with – dyeing, painting, stamping, printing, discharging, foiling, piecing. We agreed to dive in without a pre-determined outcome, and see where it led us.
Our dyeing project was intended to produce a variety of red fabrics, but most of the fabrics came out pink. But that happy accident provided each of us with inspiration and fabric for pieces we plan to create for the upcoming Cherry Blossoms fiber art show.
After 4 days of experimenting, we had a collection of fabrics with a variety of surface-design techniques. We selected some of them for our collaborative project (see initial layout in the bottom left corner below). Anne will piece the fabrics, and add some more stamping or foiling. She will then send the quilt to me to add a border, layer and start the quilting. I’ll send it back to her to finish the quilting.
The fabrics that weren’t used in the joint project will most likely show up in future work of either (or both) of us. We’re both really excited about our collaborative process, and plan to do another with a different color palette.
When I returned from my visit with Anne, I turned my attention back to the workshop I facilitated yesterday for the Grouse Mountain guild – Creating Architectural Art Quilts from Photos. It was a new workshop that I developed at the request of the Grouse Mountain guild, so I needed to put my thoughts together on paper for a class handout. Also, each participant had submitted their inspiration photo to me, to create a full-size pattern for the class.
We had 18 people in attendance, and had an interesting variety of subjects for their art quilts. I talked about and showed examples of my architectural quilts, and the various techniques I have used. Then the participants got down to work on their own art quilts – making decisions about construction techniques and auditioning their fabric selections. We all had a great time, and each person left the workshop with a planned and partially completed project. You can see some of the projects below.
Thanks for stopping by. Today, I’m linking up with these blogs – click on the links below, where you’ll find many other creative and inspirational projects.
The tree quilt is progressing well. Here it is with the trees pinned in place. They will probably get repositioned as I sew them onto the background. I’m debating whether to cover the background trees with white tulle, but will decide after I sew them all on.
On Monday night, I attended the January meeting of the Vancouver Modern Quilt Guild. Because it was the first meeting of the year, we did a show-and-tell of our first quilts – lot’s of fun stories about making our first quilts!
I also showed off a mug rug I made for a swap with a group of quilters who sell on Etsy – the Quiltsy Team. My partner in the swap said she liked “bright or black and red combo or pandas, turtles, tree frogs” I didn’t have any of the critters she likes, but I do have bright and red and black. I had an idea for bright, and an idea for red and black, so I made a two-sided mug rug!
Thanks for stopping by. Today, I’m linking up with these blogs – click on the links below, where you’ll find many other creative projects to inspire you.
Earlier in the week, I pulled all of my quilts out of storage, decided which to bring to the trunk show and organized them into groups – early quilts, art quilts, modern quilts, portrait quilts, etc. I rolled each group of quilts onto a pool noodle then placed the roll in a garment bag. The rolls go into a folding cart for easy transport. I took about 45 quilts with me. Here they are displayed on tables after my presentation.
I’ll be facilitating a workshop on February 7th for the Grouse Mountain guild. It will cover the techniques I’ve developed to create an architectural art quilt from a photo – most of which I’ve shared previously in this blog. (The workshop theme was the idea of the Grouse Mountain guild, and I’m so happy they suggested it. It’s going to be a lot of fun!)
I’ve offered to print out full-size patterns for the workshop participants from their photos – so that’s been keeping me busy, too. Here’s one I did for Trish, the workshop organizer.
And, I’m working on the next tree quilt. I was inspired by the foggy weather we had earlier this week. While driving the other day, I noticed the ghostly shapes of trees in the fog, and knew I had to try to reproduce the effect in an art quilt. Here’s what’s on my design wall.
Thanks for stopping by. Today, I’m linking up with these blogs – click on the links below, where you’ll find many other creative and inspirational projects.
Coincidentally, the theme for the first challenge of season 6 season at Project Quilting is – Trees! So I’m entering this quilt in this week’s challenge. I’m creating in New Westminster, BC, Canada.
I used a variety of black & white fabrics for the background. I thought the dark fabric at the top looked like abstract leaves. Then when I was looking for a dark fabric for the bottom, I decided it also looked like roots – so I used it there too. I pieced the background, then layered it and quilted it with a loose grid pattern. The horizontal quilting lines are about 2 inches apart, and the vertical lines are 2.5 to 3 inches apart. I didn’t worry about making them absolutely straight, in keeping with the abstract concept of the quilt.
I cut the tree shapes from freezer paper and pressed them to the back of the multicolored fabric. I cut the tree shapes with seam allowances, which I pressed to the back. I lined the tree shapes with a layer of very thin batting – which added some dimension and ensured the black and white background wouldn’t show through. I appliqued the trees to the quilted background with black thread stitched along the edges.
It finished at 16 x 36 inches. I’m calling it ‘Exuberant Trees’.
Check out the other entries in the Project Quilting challenge, and note that starting tomorrow you can vote for your favorite.
I’m also linking up with these blogs – click on the links below, where you’ll find many other creative and inspirational projects.
I’ve been contemplating my plans for 2015, and was delighted to come across this blog post by Jane – it made me think about my goals in a different way! It was hard to pick just one word, but the word Explore really resonated with me.
I’m going to explore new exhibit opportunities to enter and show my work – although I’m not sure which ones yet.
I’m exploring new workshop ideas – although admittedly the next one was suggested by the guild, not by me. In February, I’ll be teaching ‘Architectural Art Quilts from Photos’ for the Grouse Mountain Day Quilters Guild. It has also been suggested that I should develop a workshop on my techniques for making circle quilts.
I’m going to explore new techniques. I have decided to start a new series of tree quilts. The new series will be more abstract than my previous series. Each quilt will be 36 inches long and widths will vary from 14 to 18 inches. They will all feature a tree or two, but each one will have different techniques. My goal is to make one a month during 2015.
The trees will be based on one of the photos below, or possibly even more abstract like this quilt.
For the first quilt, I’m using non-realistic colors to force myself towards the abstract concept. I had a fabulous multicolored piece of fabric in my stash that I used for the tree, and I’m going to use black & white fabrics for the background. Here’s a sneak peak at my fabric selections.
I’m also going to explore a new working relationship. I’m really excited about this! My fiber artist sister Anne and I have decided we’re going to collaborate on one or more fiber art projects. In 2013 (has it really been that long!?), we collaborated on a pair of fiber art pieces for the ‘Abstracted’ exhibit by members of the Fibre Art Network. I’ll be visiting Anne later this month, and we’ll spend a few days in her studio exploring and creating. Anne is much more into surface design than I am, so I’ll also learn and explore some new-to-me material and techniques.
Do you have one word that describes your goals and plans for 2015? I hope your goals – whatever they may be – bring you fun and satisfaction. And I wish you all a happy and creative year!
Thanks for stopping by. Today, I’m linking up with these blogs – click on the links below, where you’ll find many other creative projects to inspire you.
It’s that time of year again! An opportunity to review accomplishments in the past year, and set goals for the new year.
During 2014, I created more than 25 quilts, which I think is my most prolific year so far! Here are some of the quilts I made during 2014:
I had 14 quilts accepted into quilt shows (and a few rejected). I was thrilled when I won an award at the Canadian National Juried Show!
I did 3 trunk show presentations for local guilds, and taught one very fun workshop.
My work was published in 3 magazines during 2014.
I was notified that some of my quilts will be published in a book that will be published early in 2015 – and one of my Rainy Day People quilts is on the cover!
I hope you’ve enjoyed seeing what I’ve been up to in the past 12 months. I’ll be back in a couple of days with information about my plans for 2015.
As promised, here’s my construction process of the galaxy quilt from start to finish. (I’m still referring to it as ‘the galaxy quilt’ because I haven’t decided on a title for it.) Be warned, this is a long post. It includes some photos I posted previously, plus a lot more information and photos.
Concept and design – For several months, I’ve been thinking about making an abstract art quilt of a spiral galaxy. After looking at a lot of galaxy images, I made a rough sketch of the shape I wanted to use for a quilt. My original idea was to redraw and refine my sketch, but the more I looked at it, the more I liked the abstract look of the sketch.
Here’s my original sketch. I photocopied it at 400%, and traced it onto tracing paper with a more dramatic tilt to it.
Pattern – Then I enlarged the tracing paper image by 400% onto 8 pieces of 11 x 17 inch paper. I taped those together to make my full-size pattern, which you can see below pinned on my design wall. Then I traced the design onto freezer paper, which I cut into pattern pieces and ironed to the back of the fabrics. I numbered all the pattern pieces on the full-size pattern and on the freezer paper – so I wouldn’t lose track of which piece went where.
Fabrics – I pulled a lot of fabrics with black or dark backgrounds, plus a few of lighter ones for the center. My original choices included a lot of warmer pink and red-violet colors. As I auditioned the fabrics on my design wall, I decided I wanted cooler colors – blue, purple and a bit of teal. (I will likely make another galaxy quilt in the future with the more dramatic pink and violet colors.)
For each pattern piece, I ironed the freezer paper template to the back of the fabric, cut it out with a 1/4″ allowance, then pinned it to the master pattern on the design wall.
I started with the center pieces in the lighter, brighter fabrics, then the outer pieces with the darkest fabrics. And finally the medium value blue fabrics. I was determined to use only fabrics from my stash, so some fabric choices were dictated by the amount of fabric I had.
I tried not to dither too much about my fabric choices. There was one fabric that I really didn’t like and changed later on – the gray on gray star fabric (left photo below) was replaced with a dark navy with white dots (right photo). I think it added quite a sparkle.
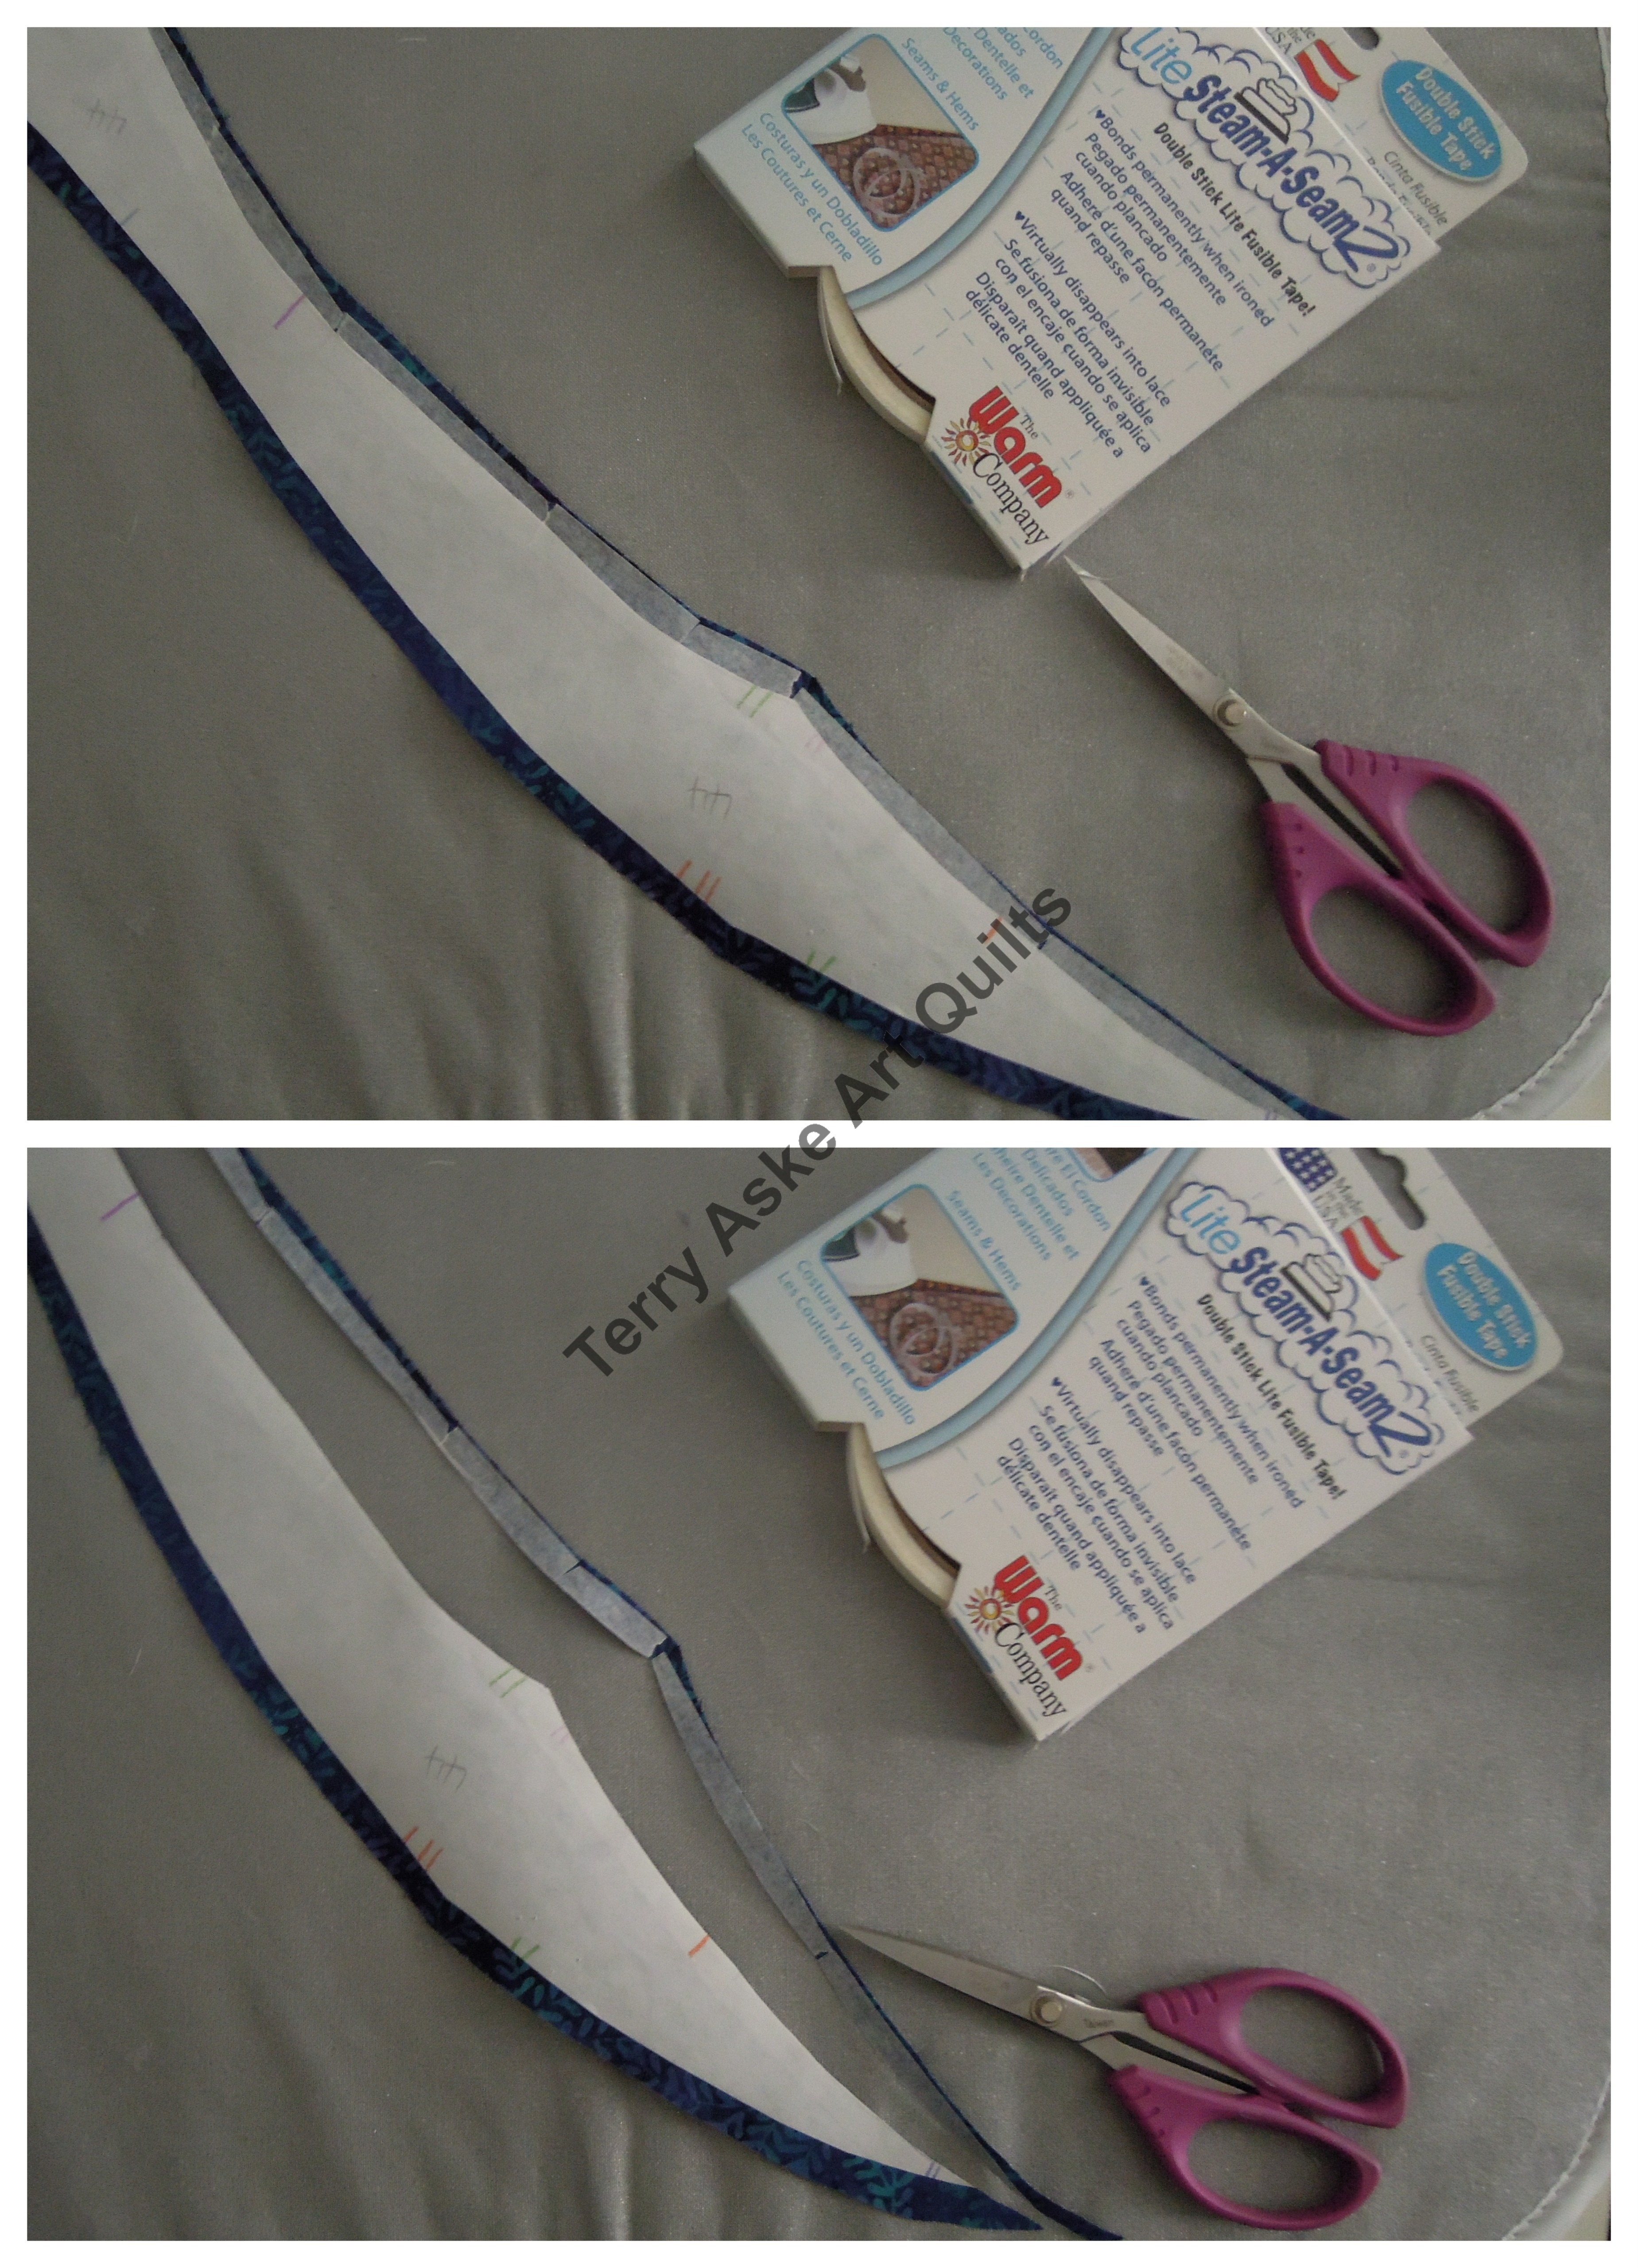
Construction process – Starting with the center pieces, I fused the pieces together. I only applied fusible web to the overlapping edges of each piece, and in most cases used 1/2″ fusible tape. By fusing only the edges, I saved time, used a lot less fusible web, and the quilt is less stiff. The disadvantage was that the fused pieces were only attached at the seam allowances, which made it a little flimsy to work with, and if I didn’t press the pieces well they sometimes fell apart and had to be reattached. I started the process using Lite Steam-a-Seam tape. When I ran out of that, I turned to some EZ Steam tape I had on hand. The EZ Steam was much stickier – which had advantages (it stayed in place better when finger pressed) and disadvantages (it would stick to itself if I didn’t pay close attention).
Here are the steps I followed to attach each piece to the previously assembled pieces (I wrote these steps out for myself, because the repetitive steps get boring and if I missed a step I risked fusing the tape to the freezer paper or iron):
unpin the fabric piece from the design wall
peel back the freezer paper on the edge to be fused
slide the 1/2″ fusible tape about 1/4″ under the edge of the freezer paper (top left photo below)
press the tape to the fabric, and at the same time press the freezer paper back in place on top of the fusible tape.
trim the fabric and fusible tape even with the edge of the freezer paper template – the freezer paper does not get trimmed (bottom left photo below)
peel back the edge of the freezer paper and remove the paper backing from the fabric
on an ironing mat, position the fabric piece in place with the fused seam allowance on top of the adjoining fabric piece(s). The adjoining fabric piece(s) will have exposed unfused seam allowance(s). Slide the new piece into position, with the fused edge of the new piece on top of the exposed seam allowance(s) and the freezer paper beneath the exposed seam allowance(s). Finger press in place.
check the placement of the piece from the back (tick marks on freezer paper templates should line up)
carefully turn over, and check the placement from the front (making sure points align, and that there are no gaps between the pieces)
press the fused seam allowance of the new piece, first from the front, then from the back. Leave the freezer paper attached to the back until the entire quilt top is assembled. (In the right photo below, the center pieces have been fused and assembled and are lying on my pressing table. The outer pieces are individually pinned to the design wall, waiting to be fused.)
In the photos below, all the pieces have been fused together. At this point, I carefully peeled off the freezer paper templates from the back, and layered the top with batting and backing.
Quilting – I quilted with 3 different variegated threads – a light gray-violet for the center, then a blue variegated on the blue fabrics, and a black-white-gray variegated for the dark fabrics around the outer edges. I tested the threads, and my ability to stitch spirals with my walking foot, on a small 12″ x 12″ sample quilt.
The sample looked good, so I quilted the full-size quilt the same way. I quilted along the fused edges to secure them in place, and to further emphasize the overlapping and intersecting curved lines and elliptical shapes. Here it is after quilting.
Facing – at first I was concerned that when the quilt was hung against a black background (as is typically used at quilt shows) the edges would ‘disappear’ against the background, and I thought I would bind it with a dark navy or purple fabric that would provide some contrast with a black background. Then I decided it might look really effective if it appeared the blend into the background, so I faced it instead using my favorite facing technique.
Title – as I mentioned at the beginning of this very long post, I’m still referring to this quilt as ‘the galaxy quilt’ because I haven’t decided on a title for it. I’ll have to decide before I enter it into a quilt show. Some thoughts I’ve had are ‘Far, far away’ and ‘Baby, it’s cold out there’, but I may just call it ‘Galaxy’. Any suggestions?
Thanks for reading all the way to the bottom. I hope this has been interesting.
Today, I’m linking up with these blogs – click on the links below, where you’ll find many other creative and inspirational projects.
As we walked around our neighborhood in the past few days, admiring the Christmas lights, I snapped a few photos with my iPhone. Here are some of my favorites.
I completed another pillow cover, bringing the total to three. I still have more of this fabric and more pillow stuffing, so I’ll making more over the next while – until I run out of supplies.
The galaxy quilt is finished, except for the binding. Next week, I’ll do a post showing my construction process from start-to-finish.
Thanks for stopping by. Today, I’m linking up with these blogs – click on the links below, where you’ll find many other creative projects to inspire you.
A couple of weeks ago, I blogged about my entries to Brandy Lynn‘s worldwide Snowflake postcard exchange. On December 3rd, Brandy let us all know who we were exchanging postcards with, and I mailed mine off to Quebec and to the U.K.
Below you can see the gorgeous snowflake postcards I have received in the last week – all very different, and all beautiful!
The blue one is from Peggy in Quebec. The multicolored one is from Annette in the U.K. And the white one is a bonus postcard from my sister Anne in Victoria BC – who said once she started making postcards, she couldn’t stop!
I’m still working on pillow covers – two made and at least two more in progress.
And the galaxy quilt is all fused.
I submitted 6 of my quilts to QuiltCon 2015, and last week I was happy to receive notification that one was accepted – ‘Shades of Gray’ (center of bottom row below) will be on display at QuiltCon in Austin in February.
Thanks for stopping by. Today, I’m linking up with these blogs – click on the links below, where you’ll find many other creative projects to inspire you.


