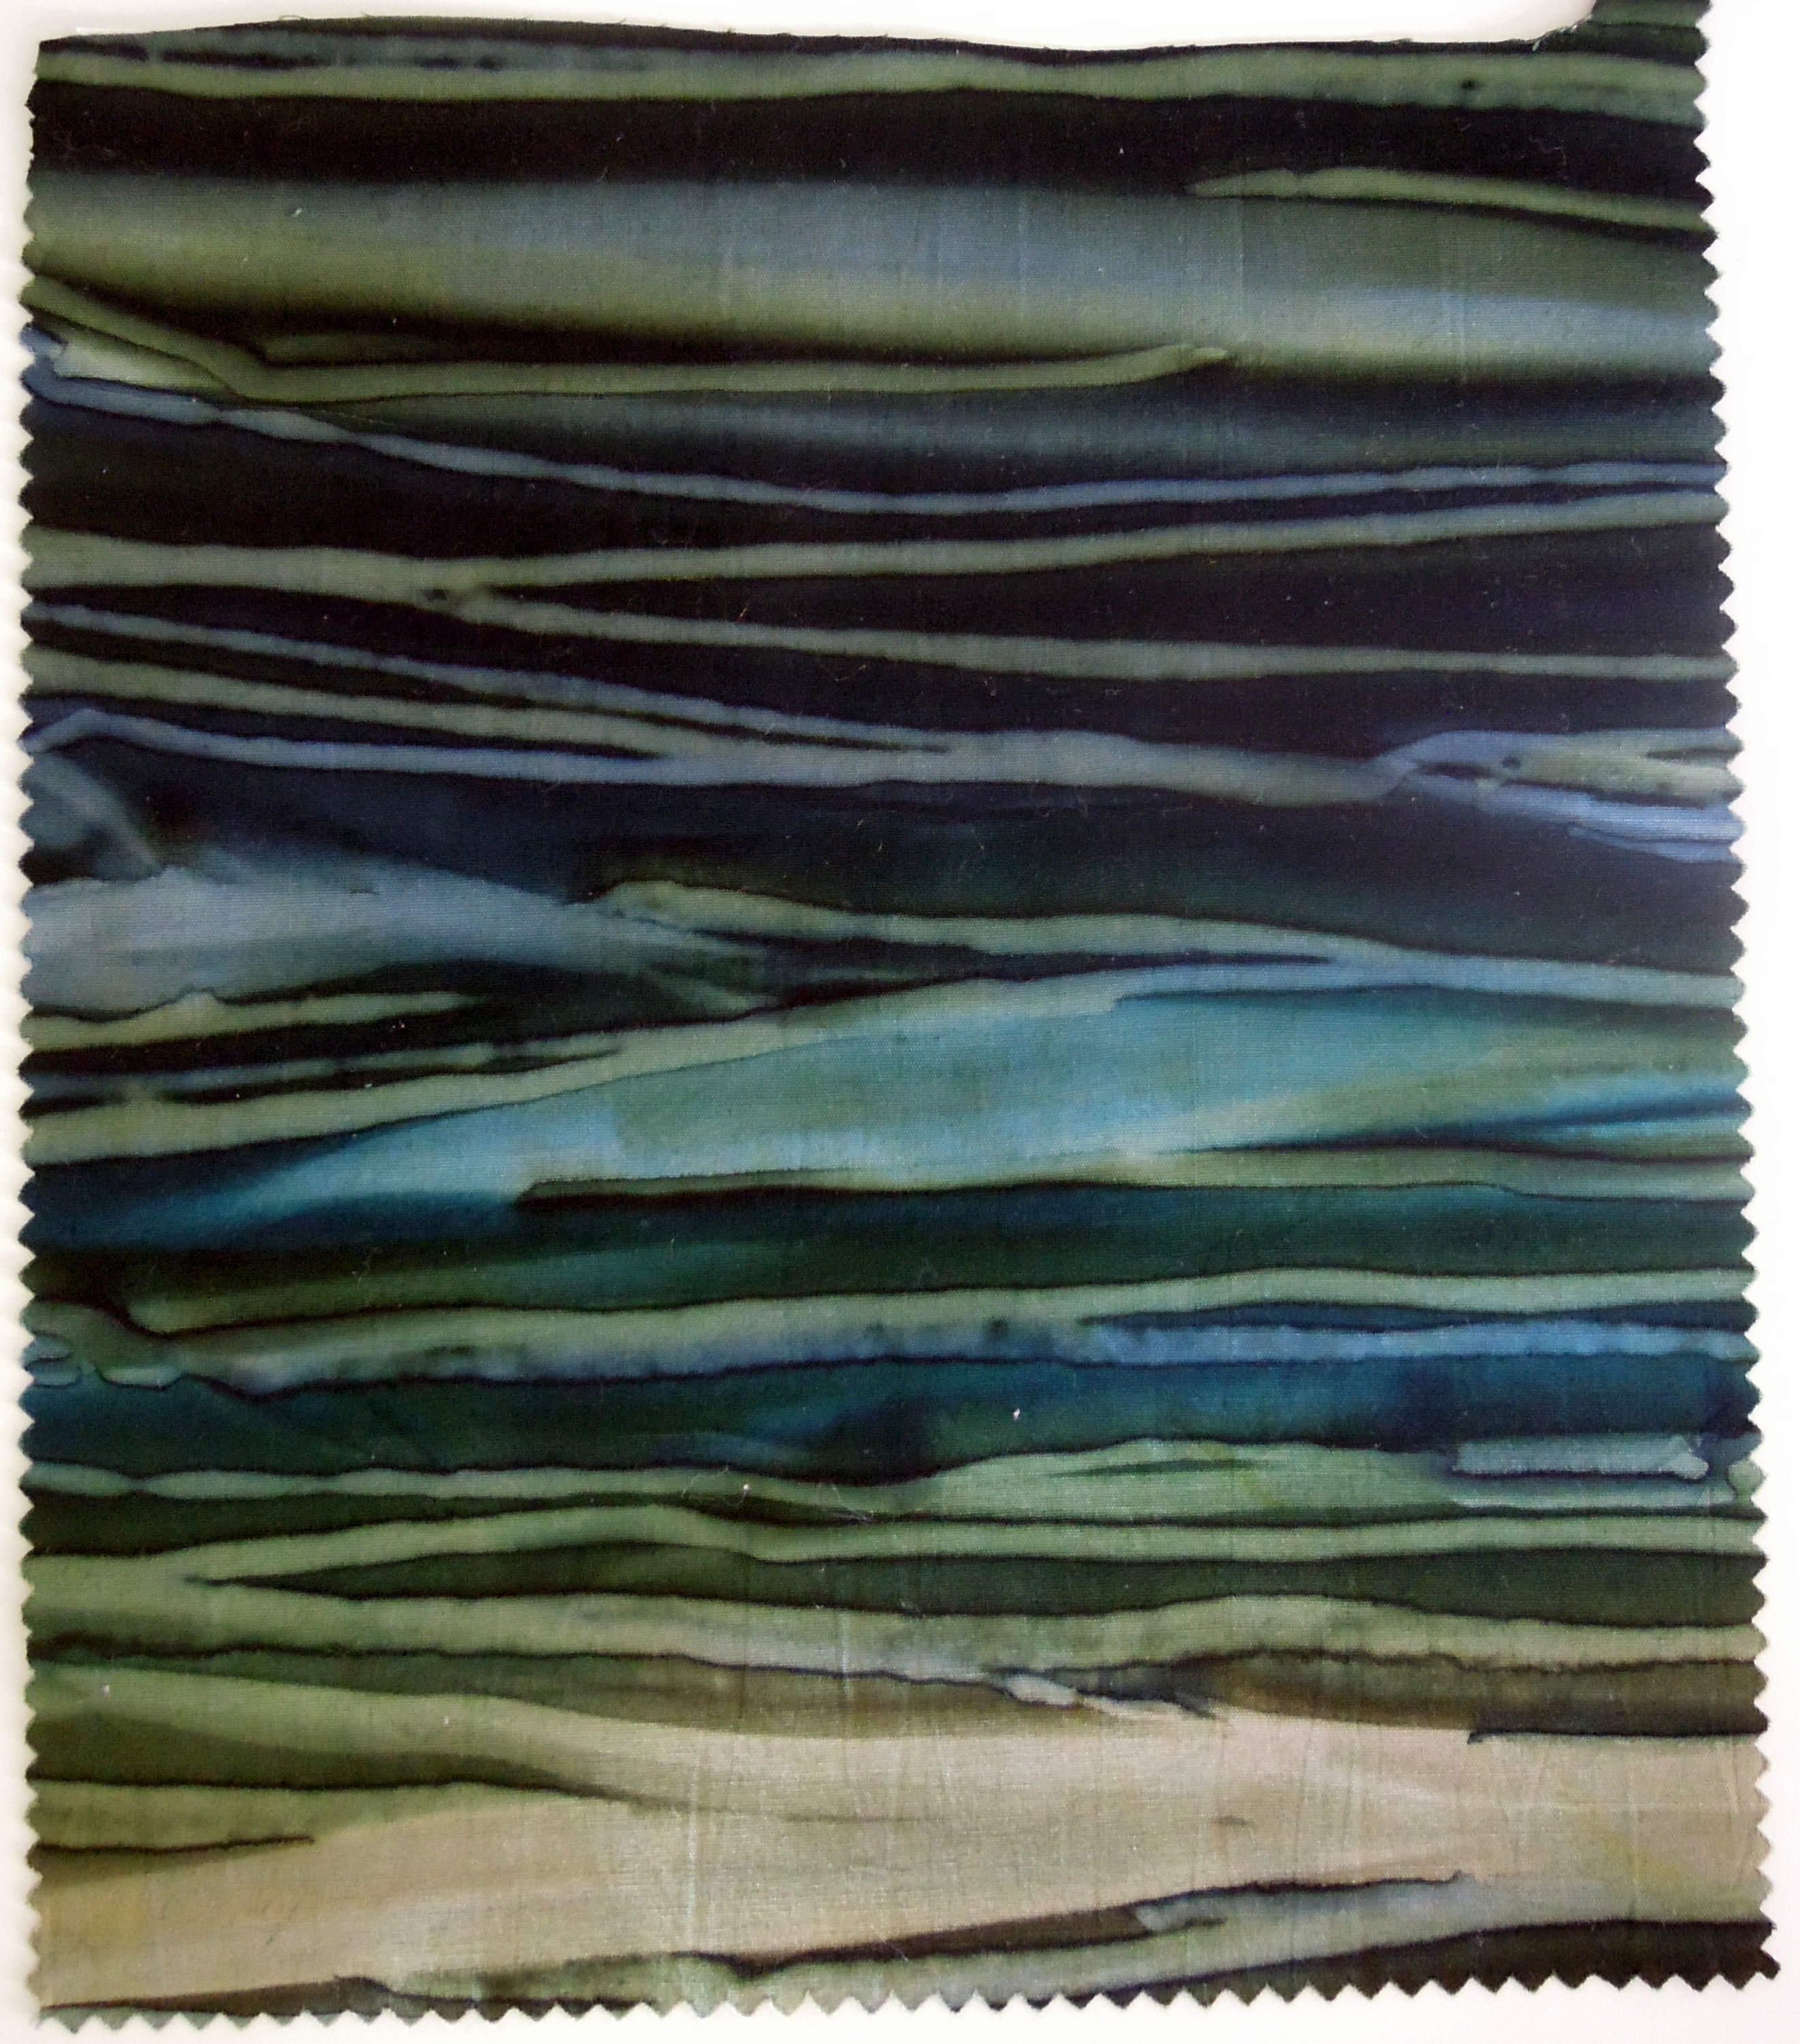
Cat portrait in progress – 2016.04.13

I’ve been working on a cat portrait, using the same techniques I used a couple of years ago for the portrait of ‘Baby’.

In February, I received an email from Maureen, which said “My 9-year-old granddaughter asked me to help her make a throw blanket with the image of her beloved cat, Casper, on it.  . . . I used Google to search for cat quilts and saw your commissioned piece on your web page . . .  Not only is your work beautiful, but Baby looks a lot like Casper!  I have attached a recent Facebook photo of Casper.  He is a rag doll breed and a lilac point color.  He has the same beautiful blue eyes and a medium length coat of creamy white fur.  I’m wondering if I could commission you to create a quilt piece similar to Baby’s (8×8”, face only) and applique the “enhanced by thread-sketching” photo-on-fabric to a fabric piece I provide.  From this, I would make a round decorative pillow for her bed.”

Maureen sent me several photos of Casper, and after looking at several options, we decided on a photo and background fabric. I cropped the photo and printed it on prepared fabric, then selected the threads I would use to sketch on the printed photo.

IMG_4213  printed on fabric, with thread colors

I fused Misty Fuse to the back of the fabric photo, then cut around the edge of the cat’s head, and fused it to the fabric background.   I used a black Sharpie to enlarge his pupils, and a white gel pen for the highlights.

Casper-ready to be fused-001  


Then I started thread-sketching.  I printed a ‘posterized’ version of the photo on paper and made notes of thread colors on it.  I find this is very useful if I need to go back later and add thread to an area.

  posterized photo, with notes


The thread-sketching is almost complete.   I had to stop because I was finding it hard to focus on light thread on light fabric.  Another couple of hours and it should be finished.

Casper-almost done


Thanks for stopping by.  Today, I’m linking up with these blogs – click on the links below, where you’ll find many other creative projects to inspire you.

   Esther’s Blog   Sew Fresh Quilts


Posted in Art quilts, On my design wall, Portrait quilts, WiP Wednesday | Tagged , , | 6 Comments

The Edge of the Pond – 2016.03.31

For the last few days, I’ve been working on the art quilt that I started designing in February.  The online submission deadline is tomorrow, and today I finished it, took photos, wrote my artist’s statement, decided on a title, and submitted it.

I called it ‘The Edge of the Pond’.  It measures 18 x 41 inches.

aske_terry_the_edge_of_the_pond


This art quilt is for a Fibre Art Network (FAN) exhibition called ‘Ekphrastic’.

The word ‘Ekphrasis’ means a rhetorical device whereby one medium of art is created to relate to another medium of art.  Usually Ekphrastic poetry is created to respond to a piece of art.  FAN put a distinctive spin on this process by inviting twelve well known Canadian poets to each contribute a poem of their choosing.  Each of the twelve poems will be interpreted by four FAN members in a wide range of styles.  In total FAN members will create 48 pieces of fibre art, both two-dimensional and three-dimensional pieces.  The two-dimensional works will all be 18 inches wide and will vary in length.  The only restriction for the 3-D pieces is that they have to fit into a medium-sized Canada Post box for shipping.

The exhibit will debut at the La Conner Quilt and Textile Museum in La Conner, Washington in October 2016, and then will travel to other locations until the end of 2019.

The poem I am responding to was written by Lorna Crozier, who lives on Vancouver Island.  It will be very interesting to see how three other FAN members interpret Lorna’s poem, and to hear what she thinks of our artworks.


To create the illusion that the fish are underwater, I constructed the quilt in the following order:

  • fuse the fish and reflections to the background fabric
  • quilt the water ripples
  • fuse the lily pads slightly overlapping the fish and reflections
  • quilt the lily pads
  • fuse the foreground irises and calla lily, then quilt them.

Of course, it wasn’t quite that simple, as I needed to figure where the lily pads would be before fusing the fish and the reflections – so there was a lot of temporary positioning, removing some elements, fusing others, quilting, adding more elements, positioning, fusing, quilting, and so on.  I started at the top of the quilt and worked my way down, finishing with the irises and calla lily in the foreground.

Here are some of my in-progress photos from the last 10 days.

Terry Aske - starting point  lily pads positioned

final lily pads positioning positioning flowers


The background fabric is a tonal, almost-solid fabric in a dark green – the exact color of many Koi ponds.  I wanted some reflections on the water, and I had a small piece of this beautiful watery fabric.  I applied fusible web to the back and drew wavy lines, then cut the fabric apart and strategically positioned my ‘reflections’.

fabric for reflections  cutting lines for reflections

I quilted the ripple lines with variegated rayon thread.  It makes it look like the sun is sparkling on the water.  At the top of the quilt I used a teal variegated thread, and at the bottom I added some blue variegated.

I kept most of the quilting quite simple – just outline-stitched most elements – and let the fabrics do the work.


I’m very happy with the calla lily.  I used a light green pencil crayon to draw the elegant curved edges of the petal and the slightly darker throat of the flower.

Terry Aske - calla lily and irises


Thanks for stopping by.  Today, I’m linking up with these blogs – click on the links below, where you’ll find many other creative and inspirational projects.

Creations by Nina-Marie    Confessions of a Fabric Addict


Posted in Art quilts, Friday finishes | Tagged , , , | 8 Comments

Off my design wall – 2016.03.06

The Koi Pond 12 x 12 inch mini-quilt is finished, except for the boring parts like sewing the binding to the back, adding a sleeve and a label.  I’m happy with how it turned out, so now I will go back to the bigger art quilt.  The online submission deadline is the end of this month, so the finishing on this one may have to wait awhile while I work on the larger one.

TerryAske_KoiPond


Thanks for stopping by.  Today, I’m linking up with these blogs – click on the links below, where you’ll find many other creative and inspirational projects.

Creations by Nina-Marie    Confessions of a Fabric Addict


Posted in Art quilts, Friday finishes | Tagged , | 8 Comments

On my design wall – 2016.03.03

Last week, I showed my 12 x 12 inch fish pond quilt before any fusing or quilting.

This week, I’ve layered the quilt and started fusing and quilting.

To give the illusion that the fish are swimming under the water and the water lilies, I first fused and quilted the fish, then fused the ripples over the fish.

To create the illusion of distance, I quilted ripple lines closely together at the top of the quilt, with small stitches.  As I got closer to the bottom, I spaced the ripples farther apart and used a longer stitch length.

I quilted the ripple lines with a variegated rayon thread that I’ve used before on several water quilts.  I first used it on this quilt, then on this one, and this one.  I love how it looks like the sun is sparkling on the water!

fish swimming in pond

Next I’ll add the lily pads, then lastly the lily flowers.  If I think I need additional ripples, I’ll slip them under the lily pads before fusing them in place.


Thanks for stopping by.  Today, I’m linking up with these blogs – click on the links below, where you’ll find many other creative projects to inspire you.

   Esther’s Blog   Sew Fresh Quilts


Posted in Art quilts, On my design wall, WiP Wednesday | Tagged , , | 4 Comments

On my design wall – 2016.02.24

I’m designing a new art quilt which will feature a koi pond and irises.  It will be 18 inches wide, and anywhere from 36 to 60 inches in length.  Fortunately, the condo building I live in is surrounded by gardens and lagoons which are home to more than 100 koi.  So I have lots of photos to use as inspiration – here are a few of them.

inspiration photos

The arrangement I’m planning will have irises in the foreground, in front of the pond with lily pads and swimming fish.   I traced some key elements from my photos, then enlarged my tracings and put them on my design wall on top of a piece of dark green fabric that is a similar color to the water in our lagoons.  I think I like the one with fewer lily pads.

tracing of photos  fewer lily pads  lots of lily pads


I decided to make a smaller version (12 x 12 inches) to ensure my idea would work when translated to fabric and thread.  At this point all the pieces have fusible web and paper on the back.  They need to be fused in place, then I will add decorative stitching.

12x12 fish pond


Thanks for stopping by.  Today, I’m linking up with these blogs – click on the links below, where you’ll find many other creative projects to inspire you.

   Esther’s Blog   Sew Fresh Quilts

Posted in Art quilts, Inspiration, On my design wall, WiP Wednesday | Tagged , | 9 Comments

Spring is in the Air – 2016.02.19

The abstract art quilt of a Cherry Blossom tree that I started last week is finished.  It’s 18 x 36 inches, and I’m calling it ‘Spring is in the Air‘.

I quilted the horizontal lines of the background before fusing the leafy fabric and sewing on the tree and branches.

background quilted and tree stitched in place


Then I fused the ‘blossoms’ and quilted them with a squarish pattern with pink thread.

Aske_T_Spring is in the Air_detail


Here is the finished quilt.

Aske_T_Spring is in the Air_full view


This is the third in my series of Tree quilts.  Here they are all together hanging on my studio wall.

TerryAske-TreeSeries


Thanks for stopping by.  Today, I’m linking up with these blogs – click on the links below, where you’ll find many other creative and inspirational projects.

Creations by Nina-Marie    Confessions of a Fabric Addict


Posted in Art quilts | Tagged , | 15 Comments

On my design wall – 2016.02.10

There’s a new tree quilt taking shape on my design wall.  The theme is Spring and Cherry Blossoms, and it will be fairly abstract, like my last 2 tree quilts.

I started by pulling out a lot of fabrics with Spring colors – mostly delicate greens and pale pinks.

I picked a couple of subtle prints for the background, an interesting plaid for the tree itself, and a green batik for leaves.  I’ll use a variety of pink fabrics for cherry blossoms.Auditioning fabrics for a Spring tree

I cut the tree and branch shapes from freezer paper.  Then I cut the fabric pieces with seam allowances that are pressed to the back, so they will have folded edges, not raw edges.  Tree is taking shape

I experimented with a couple of options for the blossoms – random shapes on the left and squares on the right. I preferred the squares, but thought I would ask for opinions from my friends on Instagram.  The responses were definitely in favor of the squares.Auditioning fabrics for Cherry blossoms

Now it’s time to take all the fabric pieces off my design wall, and to start constructing the art quilt.  I should have something to show by the end of the week.


Thanks for stopping by.  Today, I’m linking up with these blogs – click on the links below, where you’ll find many other creative projects to inspire you.

   Esther’s Blog   Sew Fresh Quilts

Posted in Art quilts, On my design wall, WiP Wednesday | 5 Comments

Star Trails – 2016.02.03

Last fall, when I heard that Brenda Gael Smith was curating a new textile art exhibition, a matter of time, I decided to submit an entry.   Although my quilt was not one of the 32 selected, I really enjoyed the challenge, and I look forward to seeing the collection.  One of the conditions was that we could not publish our quilts prior to the selection process.  Now I can show you my entry – ‘Star Trails‘.

As you probably know, I’m thoroughly entranced with circles and all the various ways I can use them in quilts. So I looked for a way to interpret the concept of time with a circular design, and I stumbled across the concept of star trails – an amazing visual phenomena created with time-lapse photography.  A Google search revealed a wealth of images.

For this exhibition, all quilts had to be 40cm by 100cm (approximately 16 by 39 inches).  Given the vertical format, I decided to position the center of my circular star trails toward one side, and to put a treeline in the foreground, similar to what I did in ‘Bad Moon Rising‘.  I decided on colors ranging from very dark blue to light purple, as if the time-lapse photography session started at dusk.  Then I experimented with ways to make the star trails.  I zigzag stitched with hologram metallic thread and pale, pastel rayon threads.   These didn’t look bright enough against the dark sky fabrics, so I tried stitching over thin white cord and ribbon.  Then I remembered my white ink pen – I drew the star trails on the sky fabric with white ink, then covered the ink with zigzag stitching.  That gave my star trails the brightness I was looking for – and made it easier to stitch in a smooth curve.

threads and white ink for star trails


I drew my full-size design on a piece of freezer paper.  I cut the circular sky sections apart, and ironed them to the back of the sky fabrics.  I overlapped the seam allowances of the sky fabrics and from the back, straight stitched in the gap between the paper templates.  Then from the front, I trimmed each seam allowance very close to stitching.  (In the first image below, the sky pieces have been stitched together, but the paper is still pressed to the back causing those unsightly ridges.  And I’m making sure the treeline pattern piece will cover the places where I transitioned from a darker sky fabric to a lighter one – tricky, eh?)   When all the sky pieces were stitched together I removed the freezer paper and zigzag stitched over each seam.   In some places I used thread that matched the sky fabric, and in other places I used contrasting threads for the star trails.  Then I did additional zigzag stitching to create more star trails.  This was all done before I layered the quilt, so I wouldn’t have to bury all the thread ends.

Sky pieces sewn together   raw edges zigzag stitched   most star trails stitched before layering


Then I layered the quilt.  I used black eco-felt instead of batting.  I quilted circular lines in each sky section with matching threads, and added some fainter star trails with a triple-stitch.  The last step was to fuse the foreground trees and quilt them.  I finished the quilt with my favorite facing method.

quilting and fainter star trails 1  quilting and fainter star trails 2


Even though my quilt wasn’t accepted into the exhibition, I had a lot of fun learning about star trails, and figuring out how to interpret them with fabric and thread.  And I’m sure I will find a quilt show in the future where I can show my ‘Star Trails‘ art quilt.

TAskeFull


Thanks for stopping by.  Today, I’m linking up with these blogs – click on the links below, where you’ll find many other creative projects to inspire you.

WIP Wednesday at Freshly Pieced     Esther’s Blog   Sew Fresh Quilts


Posted in Art quilts, On my design wall, Quilt shows | Tagged , , , | 12 Comments

Bad Moon Rising – 2016.01.31

As I in mentioned in my Goal Setting post at the beginning of January, I recently submitted art quilts to two juried shows, both of which had restrictions about publishing work prior to the decisions of the jurors.  The selected artists have now been announced for both shows, so I can now show my work.  Here’s information about one of them.  I’ll do a separate post about the other one.

My art quilt ‘Bad Moon Rising‘ was one of the selected entries for Fly Me to the Moon.  This project was conceived and organized by Susanne Jones to celebrate the 50th Anniversary of Man’s Walk on the Moon.  The collection of 178 quilts will travel for the next four years to a variety of venues.  Each quilt is 18 by 30 inches.

When I heard about this exhibition, I thought of a sketch I had made last spring (when I was exploring all the ways I could incorporate circles into art quilts).  I used photo-editing software to create a simplified image of the moon with dark, medium and light areas.  I constructed the moon first, using fused raw-edge applique.  Then I stitched the moon to the sky fabric.  I quilted the moon and the sky before adding the treeline.   My first quilting lines on the moon were too horizontal, so it was looking like a flat disc instead of a sphere.  I removed that quilting and used freezer paper strips as a guide for more contoured quilting lines.


After the moon and sky were quilted, I fused on the treeline at the bottom, and then quilted that part.  Initially, I was going to use only the dark fabric for the trees, but I’m so glad I decided to add the lighter green outline – it sets off the orange moon so well!

TerryAske_BadMoonRising-detail2

.

My statement about Bad Moon RisingThe still, dark forest waits under the brooding purple sky. Slowly, silently, the swollen orange moon rises, casting a ghostly glow on the tips of the trees. The magic of the full moon transforms the night.

TerryAske_BadMoonRising-full

.

I’m really looking forward to seeing all the quilts in the collection, but so far I’ve only seen a few blog posts by other artists whose quilts have been accepted  Here are links to them:

UPDATE: Here is the link to the website with all of the art quilts in this exhibit.

Thanks for stopping by.  Today, I’m linking up with these blogs – click on the links below, where you’ll find many other creative and inspirational projects.

Creations by Nina-Marie
Confessions of a Fabric Addict
Posted in Art quilts, On my design wall, Quilt shows | Tagged , | 7 Comments

Recent Circles workshop – 2016.01.27

On Saturday, I spent a delightful day teaching my Circles Circles Circles workshop for the Boundary Bay Quilters’ Guild.  I teach participants how to design their own circle blocks, and how to sew curves and circles with flat seams.

I brought some of my circle quilts and some class samples, and pinned them up at the front of the room.

TerryAske_circle quilts + samples 1 TerryAske_circle quilts + samples 2


Here are some of the blocks made by participants in the workshop.  I’m so impressed with the creativity and enthusiasm of this group.

BoundaryBay Circles workshop 1

BoundaryBay Circles workshop 2

BoundaryBay Circles workshop 3


Thanks for stopping by.  Today, I’m linking up with these blogs – click on the links below, where you’ll find many other creative projects to inspire you.

   Esther’s Blog   Sew Fresh Quilts


P.S.  You may have noticed an unfamiliar small rectangular quilt in the first photo above.  That’s my entry to the a matter of time textile art exhibition.  (My entry was not one of the 32 pieces selected by the curator, but now I can show it.)  So I’ll be back in a couple of days to talk about my inspiration and the techniques I used to construct this piece.


Posted in workshops | Tagged , | 3 Comments